Illuminated switch connection

In our home we focus on 100%, when we come home from work in the evening, we intuitively grope sockets and switches in a dark corridor. But we do not spend all our time at home - we go to work or visit, we go on business trips or on vacation. And here we often encounter a problem when, having entered a room in the dark, we must first determine where the light switch is located. Someone wisely came up with the idea of producing an illuminated switch for a household electrical network with a voltage of 220 V. It is designed in such a way that when the lighting is turned off in the room, the device with the indication lights up, thereby indicating our location. A household switch with backlighting is no different from a conventional one either in appearance or in design, the only difference is in the LEDs installed in it.
I would like to warn you right away, do not worry about the extra kilowatts wound up by the meter. The backlight of the room switch works only when there is no light in the room, while a tiny fraction of electricity is consumed.
Content
Varieties
The modern market is replete with such a variety of electrical goods that one cannot at least briefly dwell on the question of what varieties a switch with an indicator has.
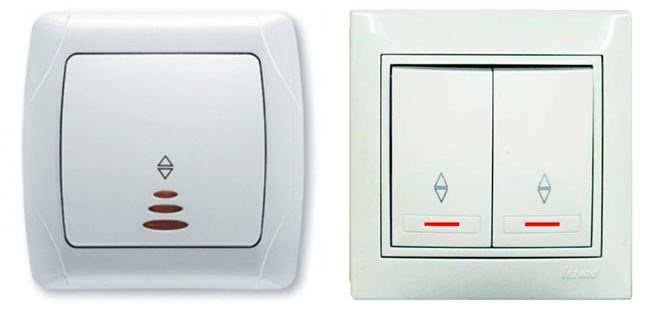
- An ordinary device with two keys (it can also be with one or three), each of them has a small window through which you can see the glow of a neon lamp in the dark. Illuminated switches of this kind are among the most common, made of plastic, and are simple to install and maintain.
- Push-button apparatus. The device of an illuminated switch of this option is distinguished by the presence of buttons in place of buttons of different configurations depending on the design (round, square, rectangular). These models are considered the most modern, made of stainless steel or plastic, look great in any interior, especially in high-tech style.
- Backlit switch. Its connection diagram provides for the installation of this switching device at several points in the room (for example, in a long corridor, a large room or a two-level apartment). That is, at the entrance to the room, they turned on the light, but when they reached the end they turned off, and there is no need to return for this. Installation of a switch of this type is advisable in private houses on several floors, hotels and hotels, office and warehouse premises.
Structural performance
Connecting a household switch with an indicator can be entrusted to professional electricians, but in principle there is nothing difficult here to do it yourself. Before connecting the illuminated switch, it must be disassembled, this gives us a good chance at the same time to get acquainted with its device.
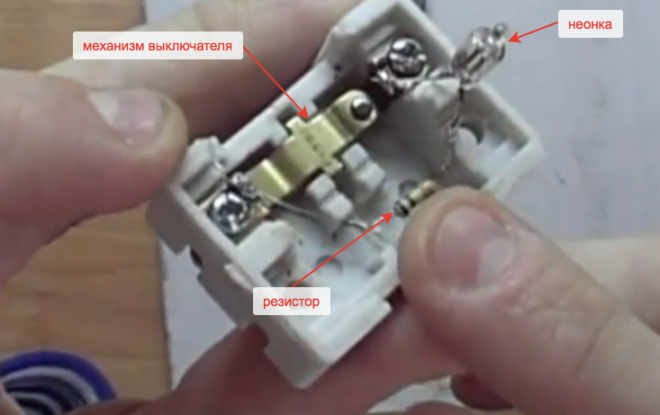
Like any other similar device, it contains an input and output contact (the latter may be several, depending on how many keys it has).
The only constructive difference is that the circuit of the device under consideration includes a neon (a special lamp) or a light diode. A resistor is soldered into the circuit with them, with its help the mains voltage is lowered to a minimum value. This voltage is not enough to light the bulbs in the lighting fixture, but it will be quite enough for the glow of a neon lamp or diode.
Well, in the keys, small windows should be mounted through which this glow will be seen.
Connection
Now we will consider the direct connection of a backlit switch in step-by-step instructions using the example of the fact that we change with our own hands an existing switching device for two keys.
- Disconnect the entrance machine to the apartment. Or, if you have a separate machine for each room, de-energize only the one in which you will work.
- Dismantle the existing two-rocker switch. Start by removing the keys and the frame, then unscrew the clamping screws and remove the inner part from the socket.
- On the back of the device, a diagram of the connection of the illuminated switch should be drawn. Guided by it, correctly connect the wires in the switch. Connect a phase from the mains to the input contact of the device, fix the "phases" going to the lighting devices to the outgoing contacts of the double switch with illumination.
- Insert the device into the socket, tighten the clamping screws, install the frame and keys.
- Apply voltage from the power source, check the result of your work. If everything is done correctly, you can immediately observe the action of the backlight, the lamps will glow (of course, the two-button switch should be in the off position at this time). Press the keys one by one, the lighting should light up.
In the case of a pass-through device, you should not have any special difficulties either. The phase wire from the network goes to the incoming contact of the second switch (which is further along the diagram), two wires go out from its two outgoing contacts, are laid and connected to two outgoing contacts of the first switching device. And one more phase wire connects the already incoming contact of the first switch with the bulb holder.
An illustrative example of connecting a backlit switch is in this video:
Combination with energy saving lamps
If you have made the connection of an illuminated two-rocker switch and energy-saving lamps in the lighting fixture blink off, you should not return to the store claiming that you were sold a low-quality device.
Here the reason lies in the device of energy-saving lamps. The small voltage that goes to the switch LED is sufficient to charge the capacitor of the economy light. A charged capacitor sends a signal to the starter, which in turn starts the lighting, as a result of which the lamps begin to blink briefly. This can be repeated many times until the bulb eventually burns out.
Most often, you have to choose from two obvious options:
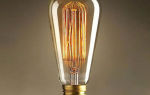
- Or, if there is a backlit switch in the room, then install only incandescent or halogen bulbs in the lamps, there are no such incidents with them.
- Or, if you want to save money by installing energy-saving lamps in lighting devices, you will have to abandon this type of switch.
But in this situation, you can find a way out:
- Connect an incandescent lamp in parallel with the economy, the current will flow along the filament, but there will be no desired energy-saving effect.
- You can connect an additional resistance (resistor) in parallel to the light bulb. It will not have any effect on the operating mode, but when the lighting is off, a small current passing through the LED in the switch will not go to charge the capacitor, but through the installed resistor.
For more information on solving the problem of flickering energy-saving and LED lamps, see this video:
There are such energy-saving LED lamps that already have a shunt resistor in their circuit and may well be combined with a connection through a backlit device. A small drawback of such lamps is only that they will need about a minute of time to burn up to full power. And their price is not small.
Standalone option
There are some masters who make a switch with a built-in LED from the previous apparatus with their own hands. And not because it's a pity for the money for a factory device, it's just that sometimes such work increases one's authority and self-esteem.
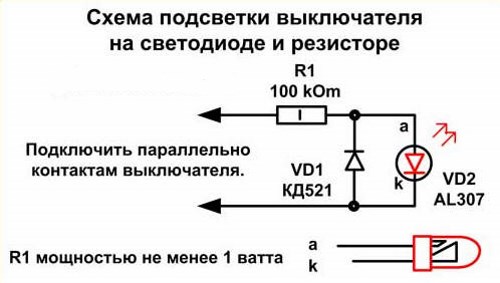
Want to try it too? Then, before making such a device, stock up on the necessary materials:
- light diode (power 2 W);
- resistor (resistance 100 kOhm);
- soldering iron.
Now remove the switch. Using a soldering iron, assemble the resistor and diode into the circuit, solder it to the input and output contacts of the switch, carefully position the diode lamp in the case so that it lies well and does not interfere. Put the device back in place.
In principle, there is nothing complicated in inventing a device on an LED with your own hands. There are only a few disadvantages:
- Firstly, there are no special windows in the keys, they will have to be drilled in some way on their own, it is unlikely that this will turn out very aesthetically.
- Secondly, the device made will work fully only if incandescent lamps are inserted into the lamp. In the case of a luminaire with a fluorescent lamp, this arrangement will cause the luminaire to glow and flash even when the switch is off. If there are LEDs in the lighting fixture, the illumination of the homemade switch will not work at all (due to the high resistance of the LED lamp).
- And, thirdly, home-made electrical appliances are always a risk that you take upon yourself.
How the illumination for a DIY switch looks like can be seen in this video:
Therefore, let us recall the old Russian proverb: "Better measure seven times, cut once." Before deciding on making a homemade backlit switch, think carefully about everything and take into account the disadvantages. Maybe it's better to take a wallet, go to the store and buy a normal factory device?
We have figured out how to install a backlit switch. They also talked about the problems that can be encountered after its installation. Then the choice is yours. But there is always a way out of any difficult situation. And the switch, which in a dark room will signal its location to you, is still very convenient.