Do-it-yourself electrical wiring in a wooden house - step by step instructions
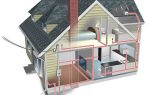
Agree that a private country house made entirely of wood is, of course, cool and beautiful. A wooden structure has many benefits. It is warm and durable, with an ideal level of humidity, and as for the ecological balance, no building material even compares with natural wood. But with all the advantages such a house has one significant drawback, firefighters call such structures "combustible material". And since electricity often becomes the cause of fires, the most pressing problem was, is and will be wiring in a wooden house. According to statistics from fire organizations, it accounts for half of all fires in buildings built of wooden beams.
Content
The main requirements for wiring
Installation of electrical wiring in a wooden house has special requirements. Due to the fact that wooden structures are classified as fire hazardous, the conditions for laying power cables and wires are completely different. Therefore, you should not think, since you know how to distinguish "phase" from "zero" or change sockets with switches, then all the electrician in a wooden house with your own hands will be up to you.
It is desirable that the entire scope of work (from supplying electricity to the house and up to the installation of the last lamp) should be performed by professional electricians. But since there are also a lot of hackers among the people of this profession, it will be useful for each owner of a private wooden house building to know the basic principles, requirements and rules for installing electrical wiring in order to evaluate the quality of the work performed later.
- Household electrical wiring in a wooden house is carried out with a cable that has a non-combustible sheath and a low level of smoke emission. You can easily distinguish such a cable by the marking; its abbreviation must contain the letters "ng" (non-combustible). Its outer shell is made of non-combustible polyvinyl chloride; this quality is achieved through the use of special plastic compounds in the manufacture. Conductors of this type have a reduced level of smoke emission, which is an especially dangerous factor in case of fires, because the smoke screen impairs light transmission and interferes with rescue operations.
- Wiring must be done in such a way as to completely exclude the possibility of electric shock to people and pets.

- It is forbidden to lay electrical wiring in a wooden house near heated surfaces (chimneys, stoves, fireplaces).
- It is necessary to completely exclude the possibility of cable ignition and fire transfer to wooden surfaces in the event of a short circuit.
- Installation of hidden electrical wiring in a wooden house is carried out only on fireproof structures.
- The installed cables and wires, as well as the installed switching devices, must be with such operational characteristics as to have a sufficient margin for the total power consumption.
- Do not allow heating of conductors and electrical connecting assemblies.
Important to remember! It is not necessary to improve the interior design of wooden housing construction by reducing the level of security.Trying to solve aesthetic problems can be disastrous.
Main stages
Step by step, the entire process of installing electrical wiring in a wooden house can be divided into several basic steps:
- Calculation of the total power that will be needed for all electricity consumers (household electrical appliances, power tools, lighting network).
- Before making the wiring in a wooden house, it is mandatory to draw up a schematic project.
- Based on the diagram and calculated data on the load, the selection and purchase of materials (wires, cables, switching devices, protection elements) is made.
- Performing input from the main power line to the house.
- Installation and assembly of the switchboard.
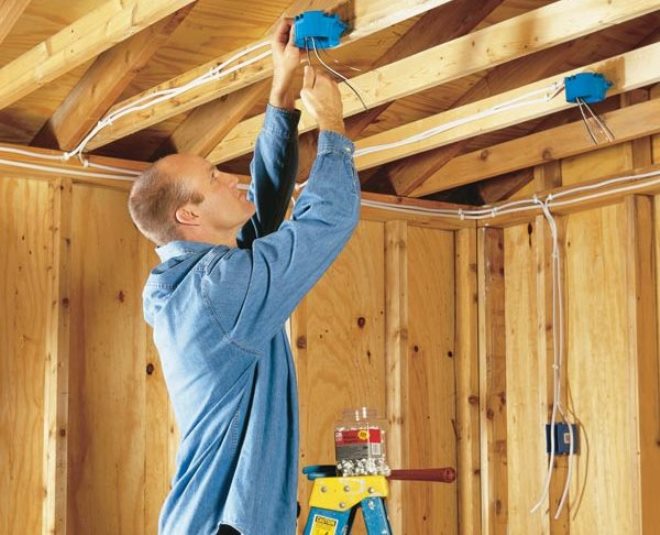
- Installation of internal wiring (in a wooden house, options for hidden and open laying of conductors are used).
- Installation of switching equipment and lighting elements (sockets, junction boxes, switches, chandeliers, lamps, sconces).
- Installation of protective grounding and RCD.
- Laboratory tests, checking the operation of the household electrical network and issuing the relevant documentation.
Project
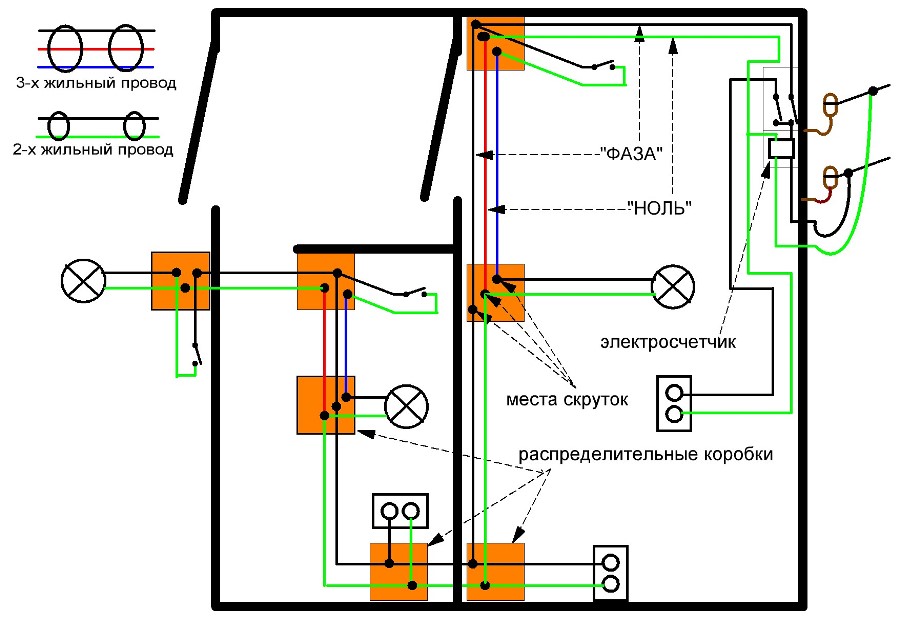
Do-it-yourself wiring in a wooden house begins with drawing up a project.
In fact, this should be a plan of the house, which indicates all the lighting elements, the location of the sockets and switches, as well as household electrical appliances that require an individual line (air conditioner, hob, oven, water heater).
It is advisable to indicate the maximum power of electrical appliances in the drawing.
The lighting load is connected with a separate line to an individual machine (if the house is very large, there may be several of them - for each room or for each floor). It is necessary to provide a separate machine for courtyard lighting.

Sockets in different rooms are also powered by individual lines. If the house is small and there are few rooms, all sockets can be connected from one machine. The exception is the kitchen, there are so many powerful household appliances on it that a separate line is absolutely necessary.
Thus, you divide the entire household electrical network of your house into groups, now calculate the maximum load for each of them. For this, the power of all electrical appliances that can be turned on at the same time are summed up. Based on the numbers obtained, the power of the input and output machines is selected.
Entering the house
The lead-in section, from the main power line to the switchboard, is considered the most critical. There are two ways to properly supply electricity to your home.
Laying the cable in the ground
This is a more reliable method, because the conductor is completely hidden and is not exposed to any external influences. In addition, in the event of a short circuit and fire, the possibility of injury to people or property is excluded. Due to such high fire safety, the underground lead-in is especially recommended for wooden housing construction. In addition, it does not spoil the appearance of the site at all.
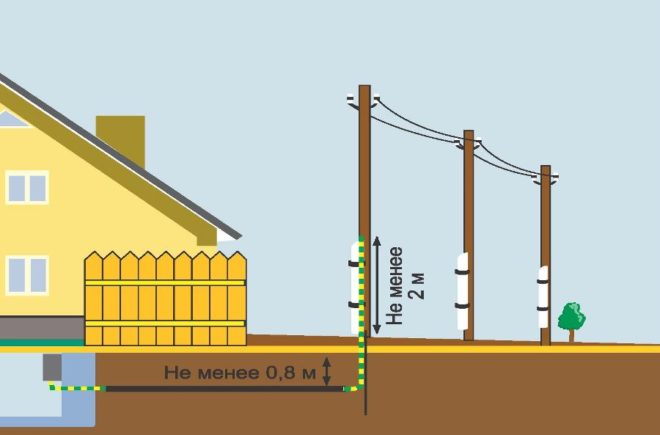
At the same time, considerable costs will be required. It will be necessary to dig a trench at least 0.8 m deep. If the passage into the house is carried out through the foundation, a thick-walled metal sleeve will be required. And it is desirable to protect the cable itself from the chemical effects of the soil, microorganisms and rodents, the pressure of the roots of vegetation. To do this, it is not just placed in a trench, but pre-stretched in a metal pipe or corrugation.
It is advisable to use the underground method at the stage when the new house is just being built, so you can think about the passage of all communications in advance.
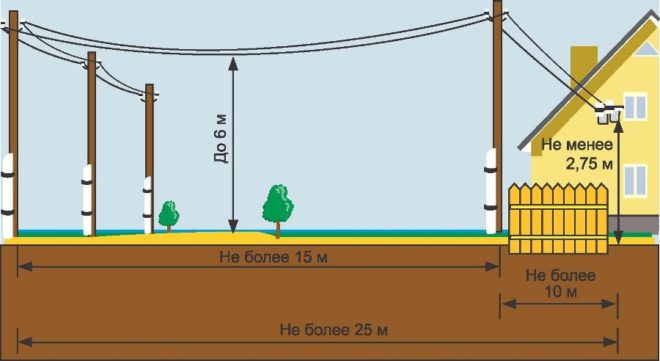
Air cable routing
If the building has already been erected, then an overhead line would be a cheaper, more convenient and easier option.A tap is performed from the nearest support of the main power transmission line.
Remember the main thing! Neither you nor your acquaintances, even with the highest electrical engineering education, have the right to climb this support to make connections. This work is done by electricians from the staff of the energy supplying organization serving this power line (they have a special permit for this).
It is recommended to use a self-supporting insulated wire (self-supporting insulated wire) as an input.
Its insulating layer is made with a material that can withstand temperature extremes, sunlight and precipitation. Under the insulation layer, the self-supporting insulated wire has not only conductive cores, but also a steel cable, which will provide a good stretch. In the case of using another cable, it will need to be fixed with clamps on an additional supporting cable, also stretched between the support and the house.
Another important nuance. If the span is more than 20 m, then an additional support must be installed, otherwise the sag will be large, which increases the mechanical load on the wire.
An air inlet is introduced into the house through a hole drilled in the wall into which a piece of metal pipe is mounted. It is very important that there are no tall shrubs and trees, farm buildings on the way of the wire.
Distribution board
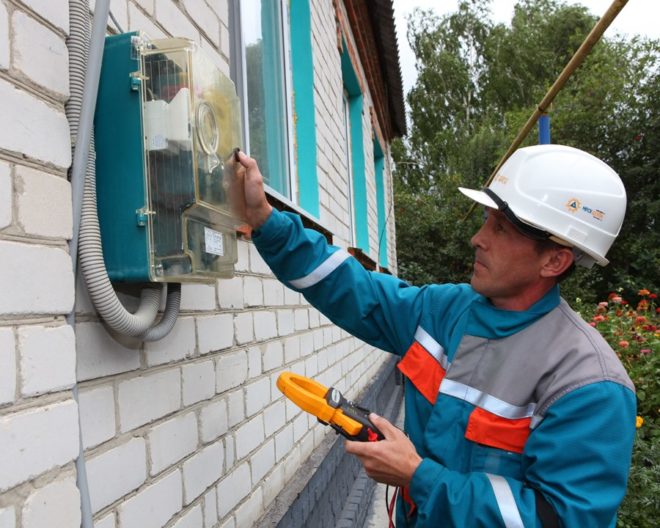
Now Energonadzor requires the installation of two switchboards in private country houses. One of them should be located outside the house, an electric energy meter is mounted in it. This is done so that the controller can come at any time and check the meter readings.
The second shield is located inside the house, it is connected to the one outside by an electric cable. It will house the input and output machines, RCD residual current devices.
In wooden buildings, hinged distribution boards should be installed, which must be protected from moisture and dust. There must always be free access to the flap.
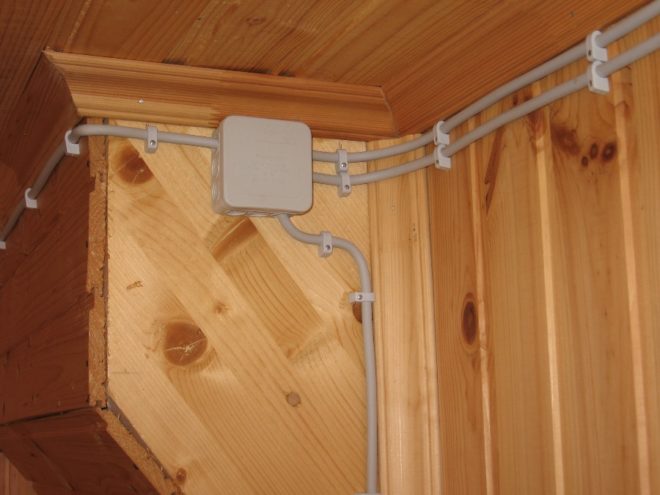
Open internal wiring
Open wiring in a wooden house (it is also called outdoor) can be done in three ways. Let's take a quick look at each of them.
Electrotechnical corrugated pipes
Now it is not a problem to buy corrugated flexible pipes. The material of their manufacture is special plastic that does not support combustion. It is necessary to lay a cable in them, and in one pipe you can place two, and, if necessary, more conductors.
Open wiring in a wooden house is quick and easy to do with your own hands, but it has significant drawbacks. It is unlikely that a few rows of corrugated pipes will add aesthetics to your room. And taking into account what loads are now, and how many different household electrical appliances are in the house, there can be from five or more such rows.
In addition, when you have already pulled the cable into the corrugated pipe, it will practically not be possible to lay it evenly, it will not be stretched like a string, anyway sags will appear in several places. Such curves also do not look very nice.
Another drawback is that the corrugated pipe perfectly collects dust on its surface, which can only be removed with a vacuum cleaner, but it is not convenient to do this everywhere.
Electrical box
Such electrical boxes are also called cable channels in another way. The most widespread boxes are made of plastic, which does not support combustion and does not emit harmful substances when melted. They are affordable, have different colors, and come in one or more sections (in such sections, you can lay several cables at once that go in the same direction).
Another advantage of boxes is that with the help of them, electrical wiring in a wooden house with your own hands is done without any problems and labor costs.You don't need any special tools, devices, experience or skills. Electrical boxes can be glued to the wall surface (most often liquid nails are used for this) or drilled and fixed with self-tapping screws. After that, the conductors are laid in the cable channels and closed from above with a snap-on cover.
But there are also enough drawbacks for electrical boxes. The most important is that a wooden house will inevitably shrink over time. This will lead to squeezing of the boxes, as a result the covers will fly off, and the cable channels themselves will crack.
To accurately perform the installation of boxes, you will need all sorts of additional parts - turns, joints, corners, plugs. And we cannot say that this gasket will decorate your room, the view still turns out to be somehow boring, similar to an office one.
Open cable
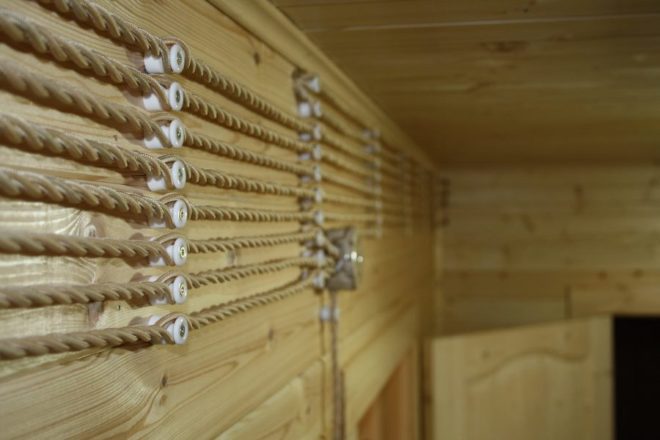
Open wiring in a wooden house, made with an unprotected cable directly along the wall surfaces, is considered the best option. But this appearance turns out to be completely dull, because it is necessary to mount a metal or asbestos gasket under the cable.
You can comply with all safety requirements and at the same time make the room original with the help of retro wiring, which has recently been gaining popularity. A special cable is laid on porcelain insulators, it turns out beautifully, especially if your interior design matches the retro style.
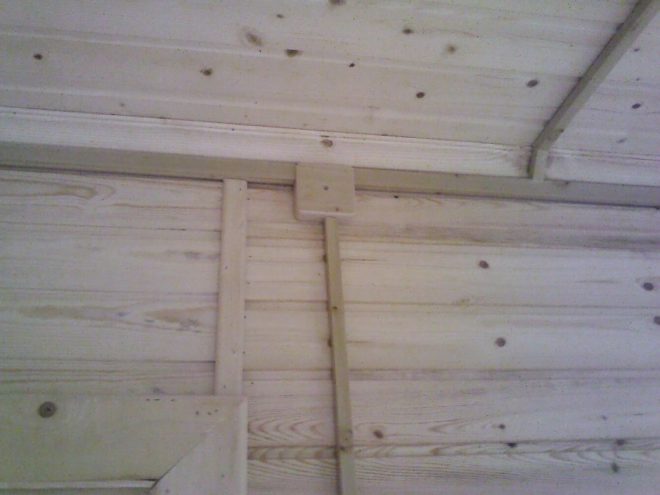
Concealed internal wiring
In general, hidden electrical wiring in a wooden house is not recommended, but if you follow all the requirements and standards for fire safety, then this method is quite acceptable. It should be noted right away that it will cost more in terms of material costs. But if you are not experiencing financial difficulties, you can use one of two hidden wiring options.
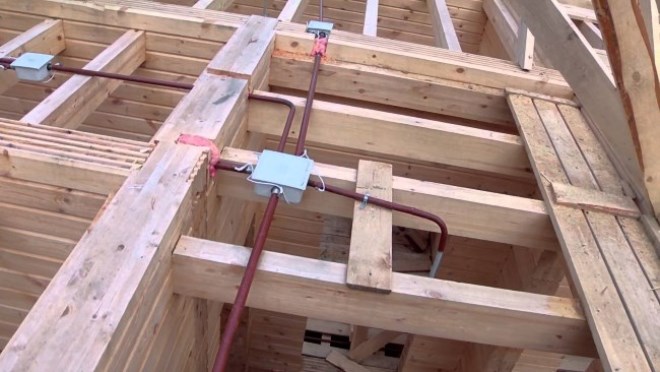
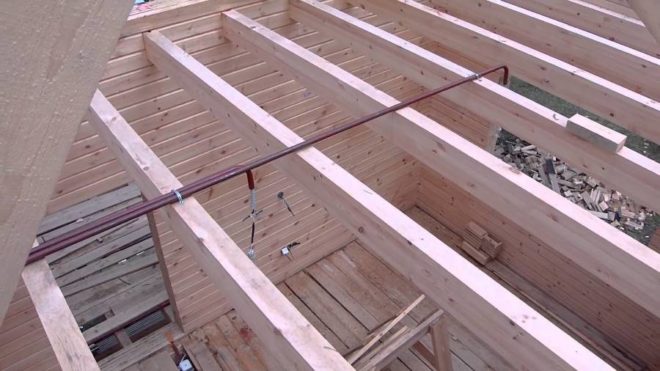
Metal pipes
The main advantage of metal pipes is that in the event of a cable fire, they reliably protect wooden surfaces and structures from fire.
They are laid in hidden cavities and voids behind wall and ceiling cladding. Or in the wall surfaces, recesses are drilled in the form of channels, into which pipes are then laid. And already inside them is a cable or wire.
It is advisable to use galvanized pipes to protect them as much as possible from corrosion. And in order not to damage the insulating layer of the cable when pulling it on the sharp edges of the metal pipe, it is necessary to use special plugs made of plastic, or to clean and grind well the cut points.
Copper pipes are considered the most technologically advanced; they bend well without special tools.
This is especially true if the hidden wiring in a wooden house has a complex branched circuit. But here, as they say, there is a double-edged sword - installation is simplified, and the price increases several times, copper pipes are far from cheap. However, it should be remembered that it is better to spend money on high-quality electrical wiring once than to calculate the losses from the fire later.
Under plaster
There is another way of hidden wiring - under plaster. Now it is used less and less. The technology is painstaking - it is necessary to criss-cross the timber with shingles (these are such wooden slats with a thickness of 3-5 mm), and on top to throw a layer of clay plaster with a thickness of at least 10 cm.Then cables are laid in corrugated pipes and another layer of plaster on top to hide the wiring ... About 30-50 years ago, this method was popular, it is unlikely that now the owners of wooden buildings from a beautiful bar will want to throw thick layers of plaster on it, at least it will look strange.
Remember the main thing! Installation of hidden wiring in wooden houses through voids and ceilings in corrugated pipes or plastic boxes is prohibited.
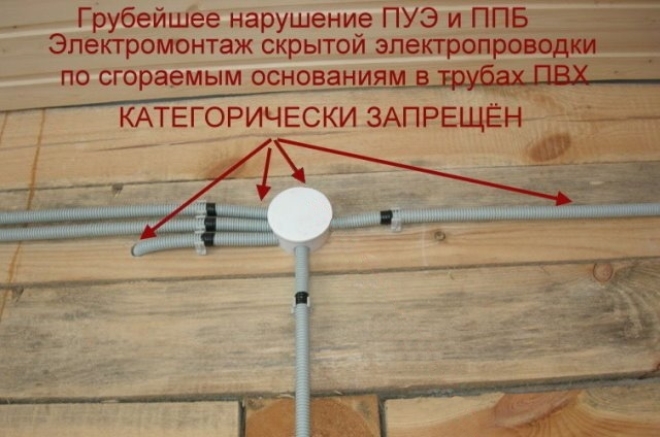
There are two good reasons for this:
- During installation, the insulating layer of the conductors may be slightly damaged.
- Rodents can damage the corrugated pipe along with the cable insulation (believe me, it will not be difficult for mice to gnaw through PVC material).
Both of these cases will result in the exposure of the conductors. And when you start operating the wiring at full capacity, in places where the insulation is damaged, the cable will start to overheat, which will lead to a short circuit and a fire.
Selection of switching devices
When choosing switching devices for a wooden structure, the first criterion should be their fire safety. Perhaps it will turn out to be expensive and will not completely fit into your design, but think again about the consequences that can happen at the slightest spark in the outlet, when there is just one tree around.
Spark formation in switching devices must be excluded, so buy quality products from well-established companies.
It is undesirable to put switches and sockets in wooden houses, the working part of which is fixed on technical porcelain. This ceramic dielectric is cheap, does not burn, but is very fragile.

When the switching device is turned on and off, it periodically heats up and cools down, that is, it experiences temperature-dynamic loads. In this case, the porcelain is covered with cracks and at a certain moment it can burst. Due to this, the working part becomes mobile, which entails a deterioration in contact, the formation of sparks and even an arc.
Therefore, buy sockets and switches, the working part of which is mounted on heat-resistant plastic, it is resistant to dynamic influences and does not deform over time. Try not to buy a fake made of cheap plastic, which begins to melt in the event of an emergency heating of the outlet. High-quality heat-resistant plastic can easily withstand temperatures up to 130 degrees.
Protective earth
Electrical wiring in a wooden house must have a protective earth. This work can be done by hand. Below is a step-by-step installation guide for grounding:
- Dig a hole in the form of a triangle with equal sides of 1 m each, a depth of 30-40 cm will be enough.
- At the corners of the triangle, drive metal pins or corners at least 3 m long into the ground.
- Weld these pins with 1 m long angle pieces by welding.

- Drill a hole in one of the corners, and use a bolted connection to secure the grounding conductor.
- Lead this conductor into the distribution board and connect to the ground bus. You will then connect all grounding conductors to the same bus.
Under the operating conditions, such grounding is required by most household electrical appliances, the body of which is made of metal.
Test work
Do-it-yourself electrical wiring in the house necessarily requires a set of test work. You will need to call specialists, and they will make all the necessary measurements and tests:
- measure the insulation resistance;
- load the machines;
- measure the resistance of the grounding conductor;
- check the "phase-zero" loop;
- perform an RCD check.
After all tests are completed, they must issue a protocol, which indicates the values of all measurements and a verdict that the wiring is suitable for further operation. This protocol will be needed for representatives of the energy supplying organization when they come to seal the electricity meter.
Visually about the nuances of electrical wiring in a wooden house in the video:
As you can see, the power supply of a wooden house has a number of special requirements and nuances. Therefore, even if you are quite good at electrical engineering, do not rely only on your knowledge and strength. In some moments, professional advice is simply necessary.