How to properly connect a light switch

It is difficult even to imagine now human existence without lighting, and, accordingly, without switches that operate this lighting. The child, having learned to walk and reach the switch, clicks it continuously, wondering at the appearance of light, like some kind of magic or miracle. But we, adults, know very well that such magic is based on the laws of physics and electrical engineering. Based on this knowledge, we will take a closer look at the switch, its main function, varieties and design, and also talk about how to connect a light switch.
Content
Main function
A light switch is a switching device with which a person controls the lighting in a room. This device performs two operations - it closes the electrical circuit, due to which the lamp of the luminaire is turned on, and opens it, while the lamp goes out.
Unlike its high-voltage counterparts, the light switch is designed to operate in lighting networks with voltage up to 1000 V. It is operated manually, not protected from short-circuit currents and overload. It does not have arcing chambers, as on high-voltage equipment, so an ordinary household appliance is designed for small current loads.

The one-button switch circuit is the most famous and common for connecting lighting elements.
But now more and more design solutions imply installation in residential premises of a complex configuration of rooms, multi-level ceilings and a group lighting system. Here it will no longer be possible to simply connect a one-key light switch; more complex models will be needed. For example:
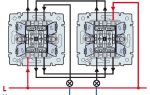
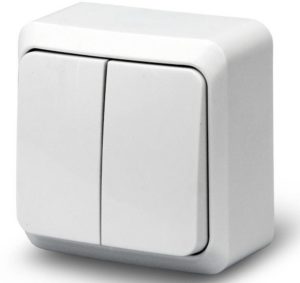
- A two-key switch will be much more convenient to use if the room has a zonal division, when brighter lighting is needed in its working part, and dimmed light is acceptable in the rest part. Such devices are also used in living rooms, where large carob chandeliers for several lamps are mounted.
- Three-key switch, combined with a socket. It is convenient to install such a device when there is a corridor, bathroom and toilet nearby. The connection diagram of the light switch in this design implies the supply of voltage by each key to a separate room, and the socket is useful in order to use a hairdryer or an electric shaver.
- Illuminated switch. A great option for any room. Entering a dark room, you do not have to shuffle your hands on the wall in search of a switch, a luminous beacon will indicate its location.
How to install these switching devices and how to connect them correctly will be a separate, more detailed discussion. However, we advise you to start familiarizing yourself with the device, the principle of operation and the connection diagram using the example of one-button switches.
Varieties
Despite all the elementaryness, the one-key light switch under consideration has several varieties, depending on the design.
 Outdoor installation. The connection of such a light switch with one key is performed in the case when the electrical wiring is carried out along the walls (in flexible corrugated, plastic or metal pipes; in special boxes; plastic cable ducts or in an open version). This type of wiring is most often used where it is impossible to hide it in the wall. For example, to connect a light bulb in a wooden country house, in sheds, garages and other outbuildings.Open wiring and outdoor switch look less aesthetically pleasing, but their main advantage is the extreme ease of installation and installation.
 Internal installation. Such devices are installed when the connection diagram of a one-button switch implies the use of hidden wiring (under plaster or inside frame walls). In this case, in order to install a light switch, a socket box is pre-mounted in the wall (they are special for plasterboard and concrete walls). All these works are fraught with a lot of dirt and dust, therefore, the installation of hidden wiring and the installation of internal switches, as a rule, are combined with the general repair of the premises.
 If you need to install the luminaire in a room where there is a high degree of humidity and the likelihood of water ingress is possible, then there is no better option than connecting a lighting bulb through a waterproof switch. Most often, this option is used for swimming pools, baths, saunas, car washes. The hermetically sealed body of the device in combination with high-quality seals will also protect against dust. Therefore, through waterproof switches, lighting devices can be safely connected in workshops and on construction sites with a high content of dust and dirt.
What else I would like to note is the external variety of switches in the modern electrical goods market. You can choose a classic or some interesting unusual design, absolutely any color. Therefore, before connecting a switch in the room, carefully consider the future appearance of the room, so that even such a trifle as a switching device is in harmony with the overall interior.
Device and principle of operation
To properly connect the switch, it will not be superfluous to get acquainted with its device first. It is equipped with the following main elements:

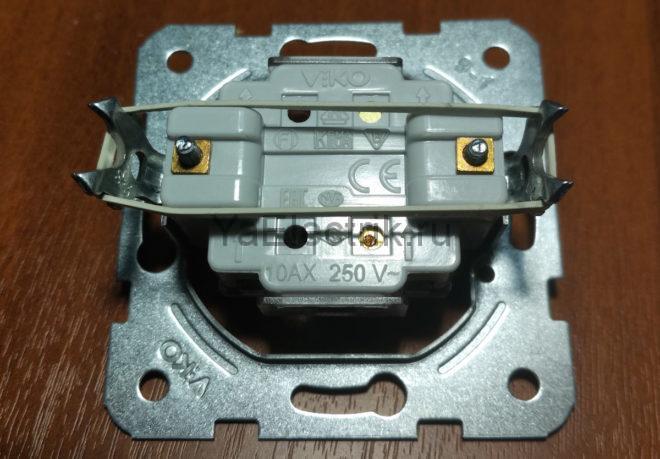
Working part. The most important element is the drive on which the key is attached. It is mounted on a metal frame. To fix this whole structure in the socket, there is a pair of sliding legs. Also, the working part contains contacts to which electrical wires must be connected.
Protective plastic elements. A key that is attached directly to the working mechanism and carries out the on-off process. The frame, made of dielectric material, protects the person from contact with the live working part. It is attached to the mechanism with screws or plastic latches.
Connecting a light bulb via a one-button switch is very simple. In the working part of the device there is a contact group consisting of a movable and a fixed contact. A wire from the power source is connected to the moving contact, the key is directly put on it. A wire is attached to a fixed contact that goes to the lamp. When you press the button, the moving contact can be in one of two positions:
- Included. It closes the electrical circuit, the phase from the mains is fed to the lighting device and the light comes on.
- Disabled. The electrical circuit is open, the phase is not supplied to the luminaire and the lamp is off.
Required tools and materials
Before connecting the light switch, the electrical wiring must be made in the room and a place (hole) in the wall must be prepared, where the switching device will be directly mounted. If this is not the case, first you will have to make grooves in the wall (for laying the electrical wire) and mount a junction box (wire connections will be made in it).To do this, stock up on the following materials and tools:
- Putty or alabaster.
- A hammer drill and a grinder with a circle on concrete.
- A spatula and a container for mixing the solution.
There is an option a little easier - to find the nearest installed junction box in the room and connect the wires in it.
To make an elementary installation yourself, and then check how correctly the circuit for connecting the switch to the light bulb is made, you will need the following materials and tools:
- One-key switch indoor.
- Polypropylene or plastic socket (mounting box).
- Lamp for one bulb.
- Insulating tape.
- Screwdriver with voltage indication.
- A knife for stripping the insulation layer on the wires.
Connection
We will remind you of the most important condition for performing any electrical work in almost every article. Before starting work, turn off the input machine.
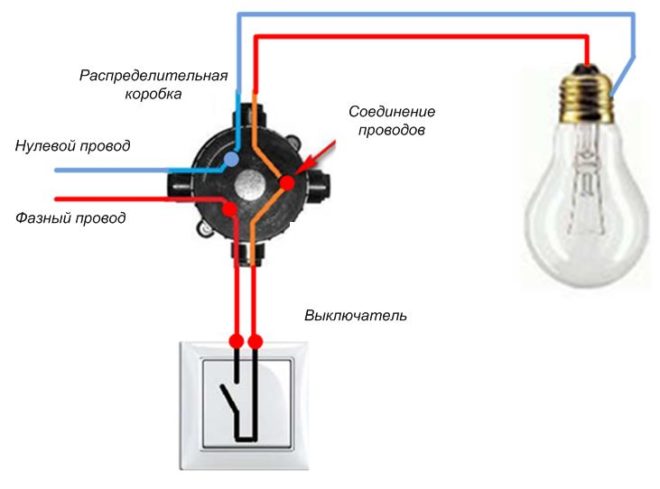
- As mentioned above, the junction box is an important element in the switch-light chain. First of all, lay a wire to the box from the power source (shield).
- From the junction box, you should have two wires - one to the switch, the second to the lamp holder. It is very convenient to use a wire with conductors with different colored insulation. For example, a red core will mean "phase", blue - "zero".
- Before connecting the wires together, cut all their ends and strip the wires. In the junction box, you need to strip the cores 3-4 cm, so that later you can make a reliable twist, in the switch and the cartridge for connection to the contacts, it will be enough to strip 5-8 mm.
- There are two contacts in the lamp holder, connect the phase wire to one of them, and the zero to the second.
- Connect the two cores of the wire suitable for the switch to the moving and fixed contact, respectively.
- Fix the frame and the switch key, and also assemble the lamp shade.
- And now the most important thing is to connect the wires together in the junction box (experienced electricians in their own jargon say "disconnect"). Here you will need extreme care, do not confuse anything, you should get three twists as a result. Connect the neutral wire coming from the supply network with the neutral conductor going to the lighting fixture. Connect the phase wire from the supply network to the core that goes to the moving contact of the switch. There remains one pair - this is the core, which is connected to a fixed contact in the switch, and the phase core of the lamp, connect them together.
- Make reliable twists (for better contact, you can also solder these places), insulate with a special tape on top and put on PVC tubes. Place all this neatly in the junction box, and close it with a lid.
- Turn on the input circuit breaker and test the switch in action.
Video
Now you know how to connect a one-key switch. You can, of course, invite electricians for this business. But in the case of this particular device, there is nothing complicated, and the result made by hand is always doubly pleasing.