How to fix a socket with your own hands
Not all electrical wiring repairs require a specialist call. To figure out how to fix an outlet, school knowledge of physics (in particular, about the structure of electrical circuits) is often enough, and to do the work itself, having the necessary minimum of tools and free time. You must also remember that before you repair the outlet, the input machine must be turned off.
Content
Required tools

For simple work with wiring, which can be done at home, you need a very small set of tools:
- Voltage indicator... Electric current is invisible to the eye, and not everyone is able to determine its presence by touching a conductor with a hand without consequences. For a preliminary assessment of the condition of the wiring, the simplest indicator, but it is better if it is a sensitive device that reacts to an electromagnetic field - sometimes you need to find out in which direction the wire leaves the outlet.
- Dielectric pliers. It is generally accepted that they are distinguished by the presence of rubber covers on the handles, but now even a standard locksmith's tool is equipped with such - so that it does not slip in the hand, therefore, on paper, those that have been verified are considered dielectric, but in practice - just with insulation. If at home there are only old pliers with non-insulated handles, then you just need to wrap them with electrical tape. In this case, you must first apply a couple of pieces of tape crosswise to the lower part of the handle, and then wrap its main part.
- Screwdrivers - Phillips are most often used, but a regular straight line can also be useful.
- Knife. The smallest will do - it is only needed to clean the insulation from the wires.
- Hammer and pry bar. They are needed as a last resort, if you have to pick walls in search of junction boxes, but as practice shows, they will come in handy anyway - at least as stands.
This kit should be sufficient, but if a standard probe is used, then some small device will still be needed to additionally test the outlet - at least a table lamp. You can also prepare a piece of wire so that it is enough from the outlet to the far end of the room - you may have to ring the wires one at a time.
Possible problems and methods of their elimination
If the outlet does not work, then all its breakdowns can be conditionally divided into explicit and implicit. The former include those that are immediately visible to the naked eye, and to detect the latter, you have to open the junction boxes, and sometimes disconnect the contacts. There are usually several sockets in a room. Some can be connected according to the original plan of electrification of the apartment, while others can be added during its operation.
Accordingly, it can never be ruled out that one or more outlets are powered from a junction box located in another room. Based on this, the primary diagnosis of all problems in the home electrical network is performed.
One outlet does not work - melted insulation
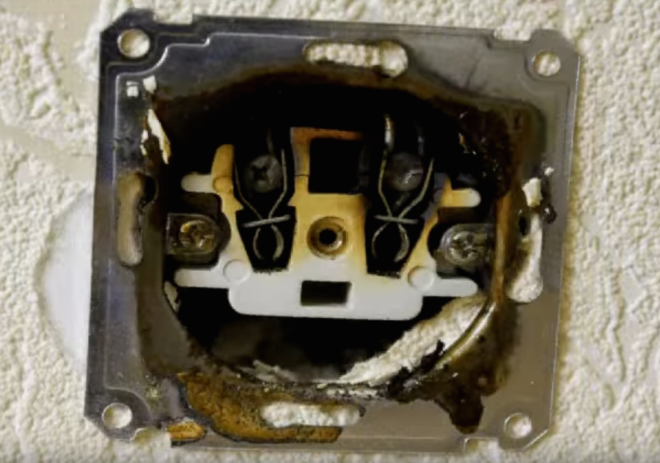
A deteriorated outlet in an apartment can visually "show" that it is out of order or that electricity simply disappears in it. The first case is the simplest - melted places are visible on the case, which clearly indicates the most likely place of the electrical circuit that needs repair.
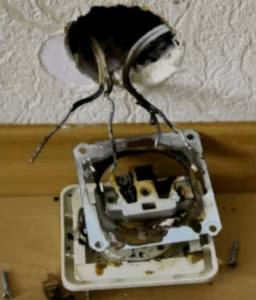
If the socket cover is melted and it does not work itself, then most likely the contact wire could burn out. After the socket is disassembled, all this will be visible to the naked eye.
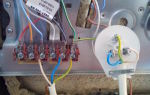
If it's just the wire, then you need to look at the part of it that is screwed to the outlet. Here it is necessary to assess the condition of the very core of the wire and insulation. If overheating has occurred repeatedly, then there is a high probability of destruction of the metal core itself at the attachment point. The metal becomes brittle, and in some cases ceases to conduct electric current - i.e. it looks like it is screwed to the contact, but does not conduct current to it. This means that you have to remove a piece of wire to the point where it is flexible and plastic again. In the worst case, the entire wire that is in the socket box deteriorates and in order to get to its intact section, you will have to disassemble the strobe in which it is laid.
Under a more favorable combination of circumstances, only the insulation itself will be damaged - it will be possible to put on a cambric or wrap it with electrical tape on the bare area. If, at the same time, darkening is present on the contacts of the outlet, then they will need to be carefully enrolled with sandpaper.
A case like the one above is detailed in this video:
The most annoying of obvious wiring faults is a short circuit. It is easiest to diagnose - the closed section of the wire is simply absent, and the insides of the socket are covered with an oily coating. Repairing the outlet in this case is impractical, even if all its parts outwardly seem to be intact. The reason is that during the occurrence of a short circuit, the local section of the wiring instantly heats up to the boiling point of the metal, and it is simply sprayed over the entire inner surface of the box, mixed with soot from the insulation. The formed plaque has a certain electrical resistance, but in some cases it begins to conduct an electric current, in fact, being a time bomb. You can carefully wipe off the resulting soot, but if it is possible to change the outlet, then it is better not to neglect it.
There is light, but there is no voltage in the sockets - where to look
A typical case of an implicit breakdown is that the sockets in one room do not work, but there is light in it. At the same time, there is voltage in the sockets of other rooms. If there was a short circuit somewhere, then the input automatic device should work or the plugs burn out, but everything is fine, and the socket does not work. This means that there is a completely or partially burnt out section of the wire on the way from the input machine to the outlet itself.
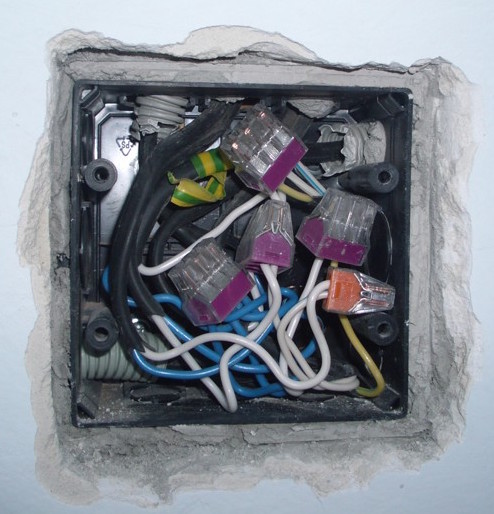
With such malfunctions, terminal boxes that are not plastered or not pasted over with wallpaper will be a good help, because in most cases the malfunction must be looked for in them. It is absolutely great if there is a wiring diagram of the electrical network, plotted on the plan of an apartment or house - its presence will simplify and speed up work by an order of magnitude.
But since in most cases these data are absent, you need to be able to do without them:
- The first thing to pay attention to is that, for example, one or all of the sockets in the kitchen do not work. If there is one, then you need to disassemble it and look for the cause initially in it.
- The second thing to remember is that the electrical circuit is damaged in weak points, which are twists and any other connections. If everything is working properly inside the outlet, then further open circuit should be looked for not in the wall, but in the junction box. In this case, it is not necessary that the burned out contact will be visible immediately - it is likely that for this you will have to unwind the insulation on the twisted wires.
- The third important point is how exactly the voltage disappeared - the sockets simply stopped working, or before that the introductory machine could work. In the second case, he was knocked out once or he “fired” after switching on.
- The latter - the faulty outlet is normal or was supplied separately, for example, for a powerful oven or electric stove.
The answers to these questions are usually enough to understand what to do next.
Finding and eliminating an open circuit in the electrical circuit
The most difficult option is when one or more conventional sockets stop working, which are not known how and where they are connected. The task is simplified by the fact that all the wiring, at least most of it, was done according to standards, which means that you can imagine how it is located. The first strand should be in the same room in the junction box. It is located at a height of about 15-20 cm from the ceiling (like the main wire), but often it turns out to be hidden under wallpaper or even a layer of plaster. If you cannot visually determine its location, you need to tap the walls.
When the box is found and opened, then there is usually a burnt contact in it, or you have to look for another box, from which the wire goes to the already checked one. Sometimes there are quite bizarre connection diagrams, when the main switchboard is in the corridor, it seems that the wire from it should go directly to the kitchen, but in fact it turns out that the wiring goes around the apartment through all the rooms and only then the last branch enters the kitchen junction box. You can't guess without a visual diagram - you just need to consistently ring all the circuits and it's good if there are special devices for this, without which only an experienced electrician can handle the task.
This video will help you understand the wiring in the apartment:
The rarest and at the same time undesirable reason why the outlet does not work is when the wire inside the wall is somehow damaged. This can be a short circuit due to repeated overheating and cooling of the wiring, or accidentally snagging the wire while drilling a wall. If the dialing shows that this particular section does not pass current, then you will have to open the strobe and change the wire. In the best case, it will be possible to determine the place of the break and only part of the wall will have to be broken, but if the wire shorted, then it is better to change it completely.
The only alternative to how to do without gouging the walls is to disconnect the damaged wire from the junction box and instead lay a new one on the wall surface - to make open wiring.