How to transfer an outlet with your own hands in an apartment - detailed instructions

The choice of the best way to move the outlet to another location depends on how much power the device is supposed to be connected to. If it is just a TV, then you can use an ordinary wire extension, and if you need to connect a socket for a high-power electric stove, an oven or an air conditioner, you will have to pull the wire from the switchboard.
Content
Open and closed wiring
The differences between the installation methods can be seen with the naked eye - open wiring runs along the surface of the wall, and for a closed one you need to groove channels for the cable to be laid. In the overwhelming majority of cases, the second method of installation is used - even at the stage of planning an apartment or house, the locations of the outlets are marked on the plan and channels are cut through the walls under them, which are then sealed with cement mortars.
Open wiring is used only if the design of the room is made in a retro style, if the house is made of wood, or in some exceptional cases when it is necessary to do without chipping the wall.
In most cases, if there is a need to transfer an outlet with a wire hidden in the wall, there should not be any special problems - of course, additional grooves will have to be cut, but this is generally a solvable issue. Another problem may arise - how to move the outlet on the wall wired with plasterboard. If it needs to be moved one or two meters in the plane of the wall itself, then this is a rather laborious, but solvable task, and when it is necessary to install a power outlet, then either remove the drywall or mount the wiring in an open way.
Alternatively, you can not remove the entire sheet of drywall, but cut a piece in the right place, and after completing the necessary work and insert it back.
Necessary tools and how to replace missing ones
A good tool speeds up work at times. If you wish, you can do with the tools at hand, but here you need to look if the loss of time is worth the money saved, for which you could rent the necessary tool.

- Wall chaser. Helps to quickly make strobes - works in tandem with a construction vacuum cleaner and does not leave dust. Your own wall chaser is a rarity, so it can be replaced with a grinder with a concrete disc or a hammer drill, but there will be a lot of dust from them.
- Powerful drill with attachment for drilling a hole for a flush mount. Can be replaced with a concrete drill - drill holes around the circumference of the circle and knock out the remains of concrete from the inside. It is also needed in a pair to the groove cutter, if the groove goes along two walls - finish 10-15 cm, which the groove cutter will not capture near the corner.
In especially severe cases (no electricity), it will be possible to make a furrow in the wall in the old fashioned way - with a chisel and a hammer, but how long it will take is difficult to say.
- Wire clips - help to make a good connection. If necessary, you can do without them - you can just twist the wires with high quality and squeeze them with pliers.
The rest is necessary in any case: socket box, socket, wire, pliers, knife, electrical tape, plaster or cement for mounting socket outlets and covering up strobes.
Ways to connect wires
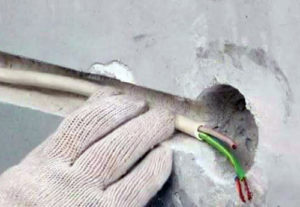
A well-connected wiring meets two conditions - the connection point passes electric current unhindered and the contact does not weaken over time.Since the conductors of the wire are round in cross-section, this means that the contact between them occurs in a small area. To ensure good conductivity, the wires must be pressed together for a sufficient length. If the conductors are clamped in rectangular fasteners, then to increase the contact area, they must be flattened slightly with pliers.

- For example, if, during twisting, conductors with a cross section of 2.5 mm² are connected, then the contact area should be no less so that a "bottleneck" does not form. To "by eye" obtain the required area, the wire is stripped to a length 10 times the cross-sectional diameter - in this case, it is 25 mm.
- It is possible to reduce the length of the stripped end of the wire by crimping the conductors using special ferrules. This deforms the wires, increasing the area of contact and firmly squeezes them together. The only drawback of this method is that if you need to add more wires to the twist, then the crimp will have to be bitten off and the veins will become shorter.
- Bolted connection - special couplings or an ordinary bolt with washers are taken for it, between which the wire cores are clamped. This method is the only one suitable for connecting wires made of different metals - copper and aluminum (one of the washers must be between copper and aluminum). They have different chemical activities and if they are connected directly, then after a while the contact will oxidize.
- Soldering is considered one of the most reliable methods, but in practice it is rarely used. Tinning of stranded wires is often used so that they do not fluff up and oxidize in the contacts of powerful devices.
- Welding - unlike soldering, where the entire open surface of the conductors is processed, only the ends of the wires are welded. A reliable method of connection, but the disadvantage is the same as that of crimping - if you redo the circuit, then the welding place must be bitten off.
The last two methods are not always suitable for aluminum wires - this is a very active metal and upon contact with air, an oxide film instantly forms on its surface. To solder or weld aluminum, you need special equipment.
Common methods for moving outlets
To choose the right way to properly move the outlet, you must have at least basic knowledge of electrical engineering - not always the method that was used in one room can show itself well in another. Everything rests on the power of devices that will be switched on at a new point.
Shortening the wire
The easiest way - for example, a wire descends from the ceiling in the wall, while the outlet is located 20 cm from the floor, and the new location will be 50 cm.
The procedure is as follows:
- Dismantling the socket and socket.
- Removing the wire from the groove to the desired height.
- Drilling a hole for a new socket.
- Putting wires into a socket box and installing it.
- Sealing the old hole for the socket and strobe.
- Installation of the socket.
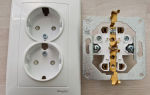
Socket Offset - Wire Extension
If a rearrangement is planned in the room and there is no outlet in the new place for a TV or iron, then the wire from the old one can simply be extended. If the wire is in the wall, then you will have to make a strobe from the old outlet to the new one.
Everything is done in this order:
- The old socket and socket are removed.
- A hole is drilled for a new socket box and a strobe is cut to it.
- In place of the new outlet, a socket is installed, and on the old one - a box for twists.
- The wire is extended and laid to a new outlet.
- The grooves are closed and the socket is installed.
In some cases, the hole for the old outlet is completely covered with cement or plaster. It is not recommended to do this, because most often it is the places of wire connections that deteriorate in the electrical circuit. Better to make an extra box and open it if necessary than to break the wall.
Daisy chain connection
If a rearrangement has been made, this does not mean that after a while another one will not be done, and then a third, and so on ... install another one in a new place.
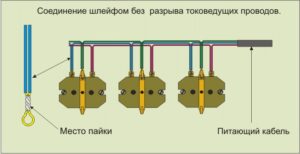
This method of increasing the number of outlets is used quite often, and new points are made by open and closed wiring. It should be remembered that it is not recommended to connect powerful devices to them - the more twists from the meter to the device, the higher the probability of damage to one of them.
There are few nuances:
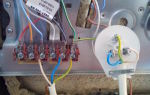
- Most often, the wires are clamped through the socket terminals. You can twist them separately, but this is just a waste of space and time.
- The wire for the new outlet must be selected with the same cross-section as for the old one.
- Always run the wires at right angles. Punching a diagonal strobe is prohibited by the rules of the PUE. In addition, if in the future it is necessary to drill a hole in the wall, then it is much easier to imagine where the wire can pass.
Laying a new line

It is carried out in two ways - the socket is laid from the junction box that is already in the room, or a completely new line is made directly from the meter. The first method is used when it is necessary to update the wire - for example, if the old one has been exposed to repeated overheating, as evidenced by hardened and crumbling insulation. A new line is being laid under a powerful device - when a socket for an electric stove, boiler or air conditioner is being moved.
Everything is done in a few steps:
- The missing grooves are made from the junction box or electric meter panel to the new outlet. If possible, you can use old furrows, but you will have to knock out putty from them.
- A circuit breaker is installed in the shield in case of a short circuit.
- The wire is laid in a gutter and fixed - covered with plaster or cement.
- The socket is installed and the socket is connected. If a powerful device is connected, then it is recommended to tin the wires.
You can leave the old outlet in its place, or disconnect and cut the wires from the junction box, dismantle the socket boxes and cover everything with plaster. There is no particular difference between the transfer of powerful outlets in the kitchen, to which a three-phase line can be connected, and ordinary household ones for 220 volts. All operations are performed in the same way, only you have to connect more wires.
Nuances when transferring outlets
When performing electrical work, you should always pay special attention to the quality of the contacts, since each of them is a potential "bottleneck" for the flow of electric current.
- Relocation of outlets is carried out on a de-energized wiring - for power tools it is better to make a temporary input with a separate circuit breaker. For a guarantee, it is worth additionally checking the de-energized wiring with a probe.
- Before you move the desired outlet to another place, you need to find out the location of the old wiring so that you do not damage the old wiring when chipping the walls.
- In panel houses, it is forbidden to slash load-bearing walls. In practice, few people listen to this, but at least make sure that the wall chaser does not damage the reinforcement inside the slab. If you want to do everything right, then the wiring must be hidden under a screed, plaster or a plasterboard wall.
- When putting wires in junction boxes, you need to remember about an assembly margin of 10-15 cm. If you do not do it, then over time even a good wire will have to be built up or changed, and this is again picking in the walls.
- Direct contact of aluminum and copper wires is prohibited.
Subject to these simple rules, any person who has the skills of working with tools and minimal knowledge of electrical engineering can move the outlet in the apartment with his own hands.