Do-it-yourself safe wiring in the bath - step by step instructions

Well, tell me, what owner, who has a country house, does not dream of building a bathhouse? Of course, baths and saunas are a worthwhile undertaking. But in addition to the fact that it is necessary to build the room itself, to equip it accordingly, you will also need the correct wiring in the bath. It is possible to do this with your own hands, but it is difficult, it is better to turn to professionals after all. The uninterrupted and safe operation of the main electrical devices that are in it depends on how well and correctly the electrical wiring in the bath will be installed. This includes sauna heaters, hot water boilers, lighting elements and other household appliances.
The electrician in the bath is different from all other rooms, because there are two factors that can cause danger - high moisture content and elevated temperatures. All this has a negative effect on the condition of the wiring, besides, baths are often made of flammable wood materials.
As a rule, electricity for the bath is supplied by a separate line from the main switchboard installed in the house. There can be two options - air and underground input.

In the bath itself, an additional distribution board is mounted, from which wiring is already being carried out in all bath rooms. Let's start at this point and consider both options.
Content
Underground input
This method is the most reliable, but there are times when it is not entirely appropriate. It all depends on where the bathhouse will be located and whether it will be possible to dig a trench for it.
Let's first consider all the advantages of underground input:
- A cable laid in the ground will not be exposed to strong winds, atmospheric precipitation, or sudden temperature changes during its entire service life.
- In the event that a short circuit occurs and an electric arc occurs, the underground cable entry ensures that property and people will not be harmed.
The air inlet does not give such a guarantee, the fire can go to a wooden building. So fire safety is the main advantage of laying the input in the ground.
- An important factor is that the architectural style and appearance of the site are not disturbed. All communication is hidden in the ground, no cables and wires spoil the overall picture.

- If you do not live in a country house permanently, then there is a possibility of theft. Unfortunately, this fact is still possible, there are craftsmen to steal wires and cables laid through the air. It is unlikely that anyone will dare to dig the underground input. This is another important advantage.
However, this method also has its drawbacks. You will have to dig a trench. If you do it yourself - spend a lot of time and effort, if you start hiring people - considerable cash costs will follow. In addition, in order to carry out excavation work, you will need to agree with various organizations that may have communications across the territory of your site (electric cables, water or gas pipes, communication lines).
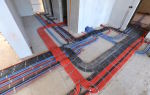
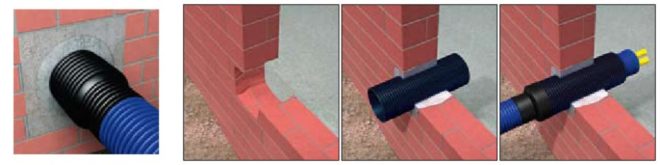
And one more important nuance. The earth, too, is not a completely prosperous environment, one might even say aggressive. Due to the chemical composition of the soil, corrosion processes can occur, as a result of which the cable sheath will become unusable.The roots of trees, microorganisms and rodents living in the ground can have a negative impact, and the impact of groundwater is also bad. So it is imperative that, before putting the cable entry into the bath, do not lay it directly into the dug trench, but first in a plastic or metal pipe.
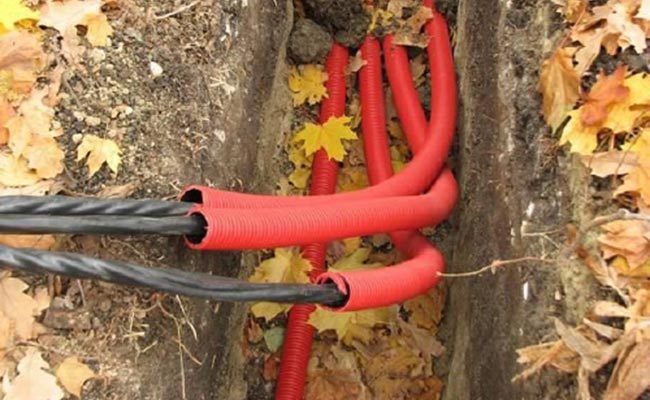
The best option for underground input would be a VBbShv cable with a section of 10-16 mm2... It is not cheap, the price is about 200 rubles per meter, but it has strength and reliability. Four copper conductors, in addition to being in an insulating sheath, also have a steel braid.
Dig a trench to a depth of at least 0.7 m, pour a layer of sand 10 cm at the bottom.When you lay the pipe with the cable, cover it with a sand layer on top, and only then fill it with soil.
Air inlet
This option is considered cheaper in terms of material and physical costs. The mere fact that you do not need to dig a deep trench already saves energy, money and time.
The air inlet is less durable because it is susceptible to mechanical damage during strong gusts of wind.
You will need to stretch a wire or cable from housing construction to a bath. I would like to warn right away that if the house is located in one part of the site, and the bathhouse is completely opposite, then, most likely, this option will not be rational due to the large distance between them. The wire will be subjected to very high mechanical stress and may break under its own weight. You will not begin to mount a few more additional supports, it is expensive and not too beautiful for the territory.
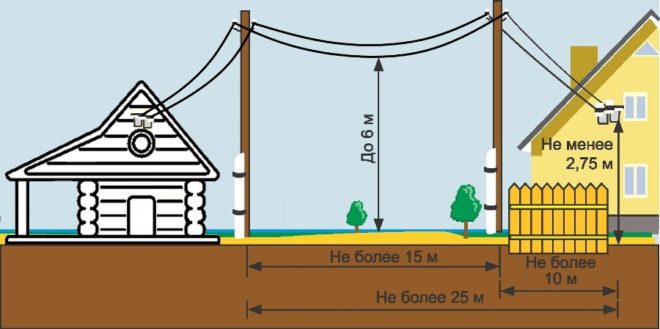
If the distance between the house and the bath is less than 20 m, then the air entry is quite acceptable. In this case, the work algorithm will look like this:
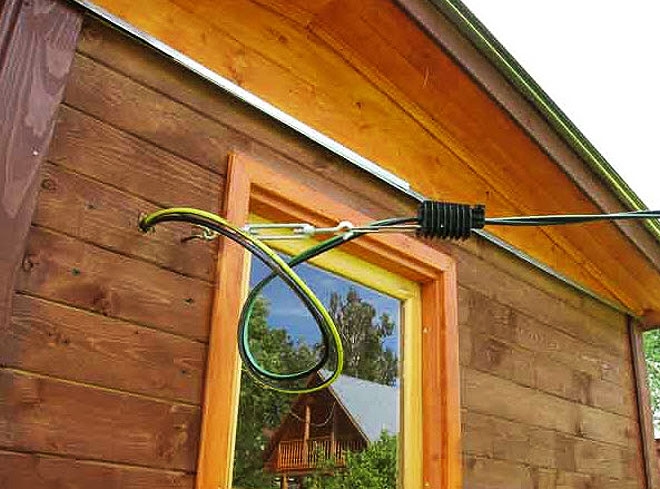
- Drill holes along the diameter of the cable in the walls of the house and bath. They will need to be fitted with a piece of metal pipe or special plastic corrugation.
- Install brackets near the drilled holes to secure the insulators.
- Pull a steel cable between the two insulators.
- Fasten the cable to the cable using plastic or metal clamps. Insert it into the prepared holes. And now it remains to connect it. In the switchboard located in the house, it is necessary to install a separate automatic machine for the bath, to its outgoing contacts and this cable should be connected. In the sauna switchboard, the cable is connected to the input general machine.
As you can see, the electrical installation of the air input is not difficult, but you will need to take into account some of the nuances:
- The places where the cable leaves the house and enters the bath should be sealed. After tightening it into the pipes, seal up all the remaining space with polyurethane foam or tamp it with non-combustible mineral wool.
- Provide sufficient tension on the steel cable.
- There should be no other outbuildings, tall bushes or trees in the path of the cable.
- The distance from the ground to the conductor must be greater than 3.5 m.
- Do not pull the cable too tight, it is not a string, fasten it loosely to the steel cable.
The best option is to use a wire marked with self-supporting insulated wire (self-supporting insulated wire) for air entry. It has a certain design feature, in addition to conductive aluminum conductors, there is a steel cable under the sheath.
That is, when using such a wire, you will not need to pull on an additional cable for fasteners.
Another advantage of SIP, its insulating shell is made of materials that withstand precipitation and sunlight well.
The option is not excluded that the air inlet to the bath will be mounted from the main power line. This may be the case when the bath room is located near such a line and it is more expedient to pull the input from it than from the house.This will require a special permit and a project from the energy supplying organization, as well as the installation of an electricity meter in the sauna switchboard.
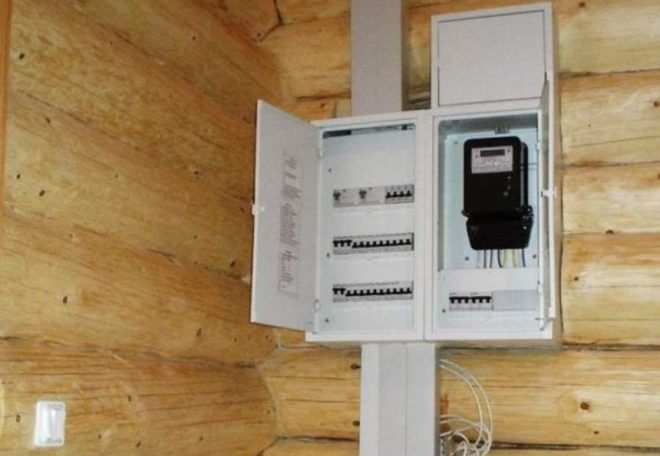
Switchboard and load calculation
All electrical wiring is routed in the bath from the switchboard. When choosing a place for its installation, several rules must be observed:
- There should always be a free approach to the flap.
- Adequate lighting must be provided in the room where the shield is located.
- Also, this place should be ventilated.
- It is forbidden to place the shields in the steam room or in other fire-hazardous rooms, most often they are mounted in dressing rooms or rest rooms.
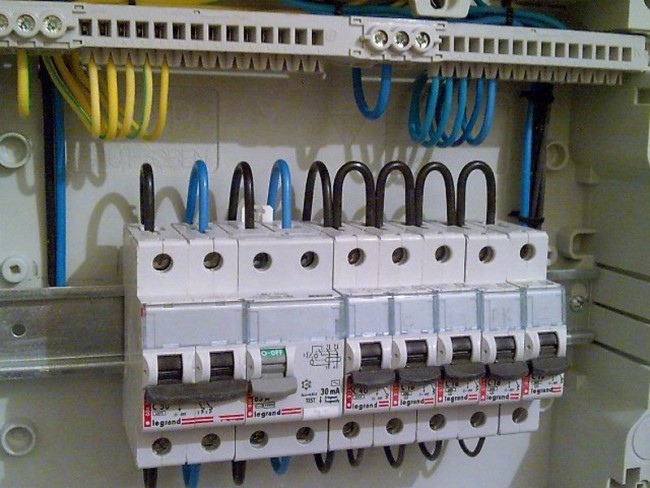
An input circuit breaker and outgoing circuit breakers for individual electricity consumers must be mounted in the switchboard.
To select the power of the input machine, you need to know the total load. Add up the rated power of all electrical appliances involved in the bath, do not forget to add the lighting load. Divide the resulting figure by the voltage value. For example, you have a power of 5000 VA, divide the resulting figure by 220 V, and you get 22.72 A. Choose an automatic machine with a small margin, a 25 A device is quite suitable. Calculate the power of the outgoing machines using the same principle.

Before making the wiring in the bath, draw up a schematic diagram of the power supply. It should display all the main consumers of electrical energy:
- Electric heater.
- A heat gun is often installed to dry the premises.
- Electrically heated floor.
- Pump.
- Electrical meters for humidity and temperature.
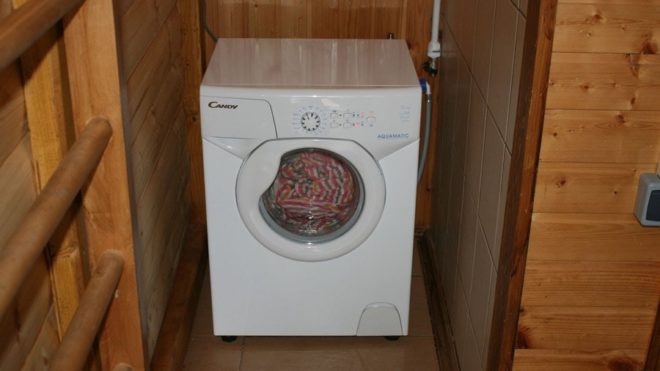
- Perhaps you will have a washing machine there.
- Electric kettle and hairdryer.
- Water heater.
- Pool lighting.
- Refrigerator for soft drinks.
- TV, stereo system.
- SPA equipment.
In the switchboard, assign a serial number to each machine and somehow outline it (write with a marker or glue a piece of paper with a number). On the door of the switchboard, stick a list of machines with a serial number and the room that it supplies.
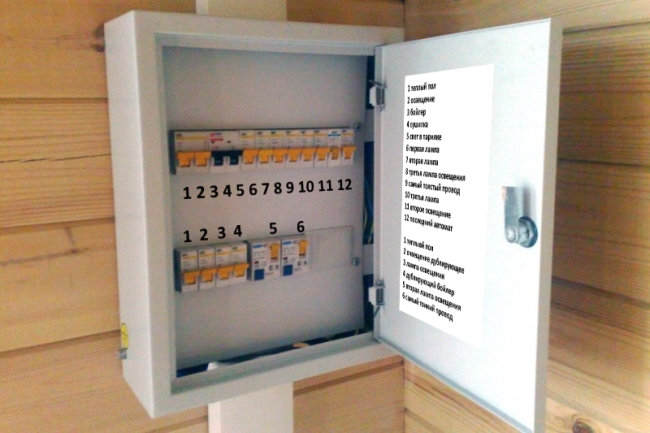
It should look something like this:
- 1 - stove-heater;
- 2 - steam room;
- 3 - washing room;
- 4 - dressing room;
- 5 - pool;
- 6 - rest room.
Also on the dashboard door there should be a wiring diagram in the bath.
It is imperative that in addition to the machines, residual current devices (RCDs) must be installed in the switchboard. In case of contact of the electric consumer with water, they will work and turn off the power.
General rules for internal wiring
Consider special requirements when wiring:
- Electrical installation from the switchboard must be carried out in one piece of wires and cables, any intermediate connections are prohibited.
- Conductors with metallic sheaths should not be used.
- If the bath is made of wood, then only open wiring is allowed, laid on top of wooden surfaces. It is forbidden to place wires in PVC pipes.
- It is strictly forbidden to install wires over the oven.
- In the case when the bath has a brick design, it is allowed to mount hidden wiring hidden under a layer of plaster.
- Be sure to use protective grounding.
- Laying of wires from junction boxes is carried out strictly at right angles, they must be laid only horizontally or vertically, no "obliquely" is allowed.
- The cores are connected by welding or soldering, twisting is strictly prohibited.
- Do not place wires near doorways or windows, metal pipes, or batteries.
- In rooms with high humidity and temperature, for example in a steam room, it is forbidden to place switching devices (switches, sockets, and also junction boxes).Otherwise, moisture will accumulate in them, which will inevitably lead to a short circuit. It is best to choose a dressing room or a rest room for their placement.
Choice of lighting equipment
As for the lighting elements, ordinary lamps can be installed in dressing rooms and in rest rooms.
In shower rooms and steam rooms, you need to install lighting devices with an IP-44 degree of protection. The environment in these rooms is extremely aggressive, with high temperature and humidity constantly present. Therefore, the electrical part of the luminaires should under no circumstances be exposed to water. This requirement is mandatory, which guarantees the safety of visitors.
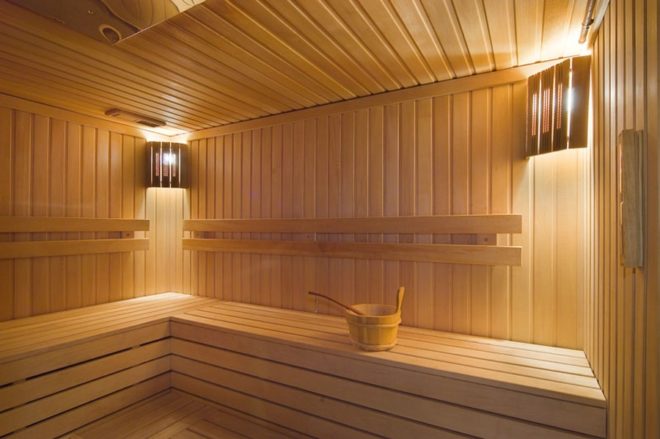
Also, when choosing lamps, take into account the fact that the steam room is a place for relaxation, so bright light is not needed here, but rather, on the contrary, dim and dim.
Heat-resistant lamps should be installed in the steam room; it is desirable that their shade is made of stainless steel.
There are also special requirements for the installation of lamps in the bath. Regardless of how heat-resistant they are, they should not be positioned over the oven; it is best to mount them on the opposite wall. When positioning the lighting elements in the shower room, do not place them close to a water source.
The safest option is 12V halogen lamps, they require a step-down transformer and should only be installed in dry rooms.
In baths, it is best to place lighting elements on the walls, and not on the ceiling, because vapors and the highest temperature are concentrated at the very top.
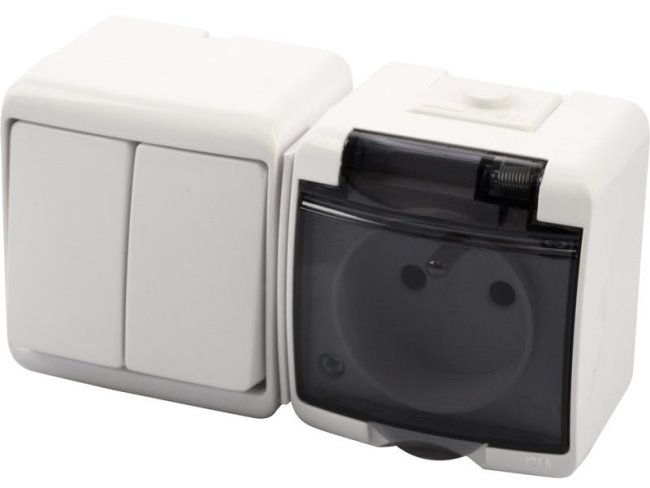
Choose switches with sockets for a bath with the same protection class IP-44, they must be with covers.
Internal wiring
If you nevertheless decide that you can do the electrical wiring in the bath with your own hands, then take into account the following rules. First of all, it must necessarily be resistant to high humidity and high temperatures.
Benefits of open wiring:
- All electrical wiring is visible, and in the event of any damage it will be much easier to detect.
- Any damaged area can be easily dismantled and replaced with a new one.
- Open wiring, even if it seems to you that it does not fit into the overall design, can be given an original retro look on porcelain insulators.
For electrical wiring in the bath, double-insulated wires must be used. In a wooden frame bath, under the wire, place asbestos plates with a thickness of at least 0.3 mm. In the event that damage to the wire occurs, such a measure will prevent the possibility of fire on the wooden surface.
Install horizontal wiring sections at a distance of 20 cm from the ceiling.
In the dressing room and the washing room, install the wiring under the ceiling in cable channels, in the steam room - only on roller insulators. Alternatively, you can run the wire from the washing room to the steam room through the wall in a steel sleeve.
Then a lamp should be located at the entry point of the conductor, that is, the wire coming out of the sleeve will be immediately led into the lighting device.
All wiring in the bath is carried out in metal or flexible corrugated pipes, or special plastic boxes. They are made of a material that, in the event of a fire, does not support an open fire, but only melts.
It is necessary to lead wires from one room to another through steel pipes, which are inserted into holes made in the center of the log.
All wiring is recommended through the attic.
Very important! Do not use vinyl or rubber braided conductors when wiring in a bath.
If you plan to install a washing machine in the bath, then place it only in a dry room and lead a separate supply line from an individual machine.Also, a separate line must go for the heating tank.
Connecting the sauna heater
To connect the sauna heater, you need a three-phase circuit breaker and a magnetic starter. The automatic device is a protection against short circuits and overvoltages, the starter contributes to the automatic control of heating.
To connect it, stop your choice on a cable of the RKGM or PVKV brand, all of them are heat-resistant. In this case, sockets are not used, the heater is connected with a cable directly from the panel.
It is important to correctly install the humidity and temperature sensor, it should be located above the entrance door to the steam room, and it is generally better to take the control panel to the next room.
If the heater's power is low (up to 4 kW), then a single-phase power supply will be sufficient.
Visually, the general principles of electrifying a bath in the video:
In principle, you can do the wiring in the bath with your own hands, but still, do not neglect the specialists in this matter. If you do not invite them for editing, then at least consult on any controversial issue. Remember that this is a guarantee of your safety.