Do-it-yourself kitchen wiring - how to calculate, choose and make?

In modern houses and apartments, the kitchen is the most loaded in terms of electricity consumption. This is not surprising to anyone, we all know that almost half of household electrical appliances are concentrated here. When planning renovations, electrical wiring in the kitchen should be a top priority. It is necessary to accurately calculate the loads, according to the calculations, select the conductors and switching devices. So that later it does not turn out like this - the hob, the oven, the extractor hood are working, and you decided to heat the electric kettle, and that's it, the machine went out, the electricity ran out.
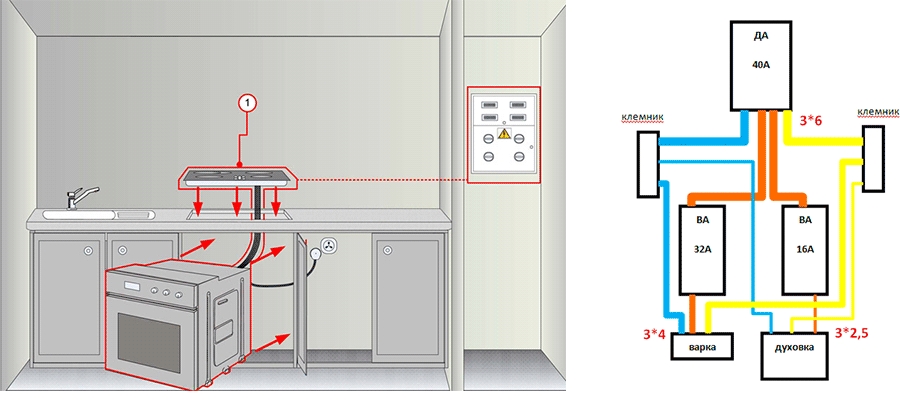
Some household appliances are so powerful that they require a separate line from the switchboard and connect through an individual machine.
Immediately I would like to warn those who bought an apartment in Soviet-built houses. Perhaps in other rooms (bedroom, hall) it is enough to replace the switching devices and install a couple of additional sockets. But the wiring in the kitchen needs to be installed completely new, do not even try to revise the old one.
Content
Preparatory work
There is a wonderful proverb: "Well planned - half done." Therefore, kitchen wiring begins with a project. Plan the locations for your kitchen furniture and appliances.
Try to determine as accurately as possible what household appliances you will use and what power they are. Now calculate the load maximum, for this add up the power of all electrical appliances connected at the same time (do not forget to add lighting here). You will need to build on the resulting figure when choosing the cross-section of the wires and the rated current of the switching devices.
Will single phase voltage be enough for you? Most likely, this problem will not arise for ordinary apartments. But if you have a huge country house or a multi-level apartment, and they have kitchens equipped with all existing appliances and heated floors, then you will need to supply a three-phase electrical network. In any case, for the safety of electrical wiring, it is advisable not to turn on all available kitchen appliances at the same time.
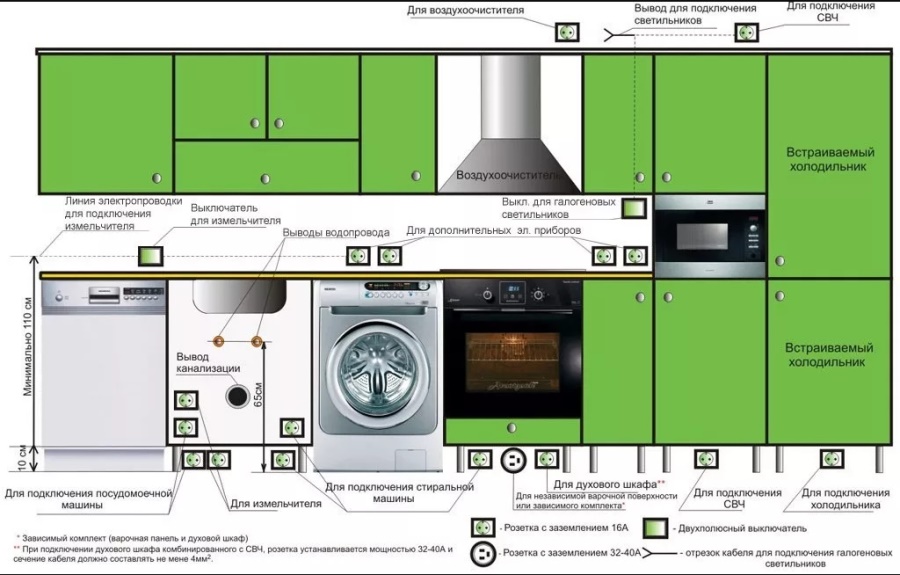
It is advisable to divide all kitchen equipment and, accordingly, the wiring into several routes. Each will originate at the entrance to the kitchen, that is, from the junction box. The end of each branch is a light bulb or socket.
Each outlet branch can have a different number of outlets, it all depends on which household appliances will be connected to them - low-power (from 0.5 to 0.8 kW) or powerful (from 0.9 to 2 kW). To connect low-power equipment, you can install an outlet block; for each powerful household appliance, you will need to mount a hotel outlet.
If the power of the electricity consumer exceeds 3 kW (boiler, water heater or underfloor heating system), then an automatic machine is installed instead of the outlet.
This division looks something like this:
- Lighting branch, from which all lighting elements in the kitchen will be powered.
- Branch to the "warm floor" system.
- Branch for the outlet block, which will include low-power household appliances (toaster, mixer, microwave oven, juicer, food processor, etc.). As a rule, such a block of outlets is located on the working wall at a level of 1 m from the floor. Note that this will include techniques that are used periodically, not all the time.
- Separate branches for connecting powerful household appliances (electric oven, hob, washing machine or dishwasher).
- Branch for a double socket, where, for example, a refrigerator and an extractor hood will be connected.
Options for distributing sockets on the video:
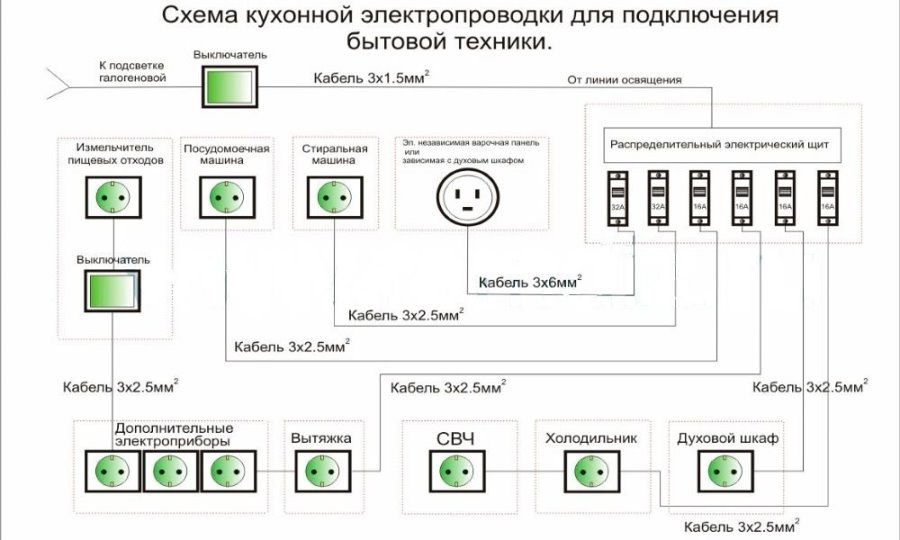
From the general switchboard to the kitchen room, it is necessary to lead an input cable of a suitable section, which, according to its technical characteristics, will withstand the load of simultaneously switched on household appliances. The cable is fed into the junction box, and there it is switched with the outgoing branches.
Elements of kitchen wiring
The kitchen wiring diagram includes the following main elements:
- distribution box;
- electrical cables and wires;
- switches and sockets.
Conductors can be laid in an open and hidden way, but most often in kitchens they are hidden under the interior decoration. There are no aesthetic requirements for them, it is important that they have safety, sufficient electrical conductivity and the required performance.
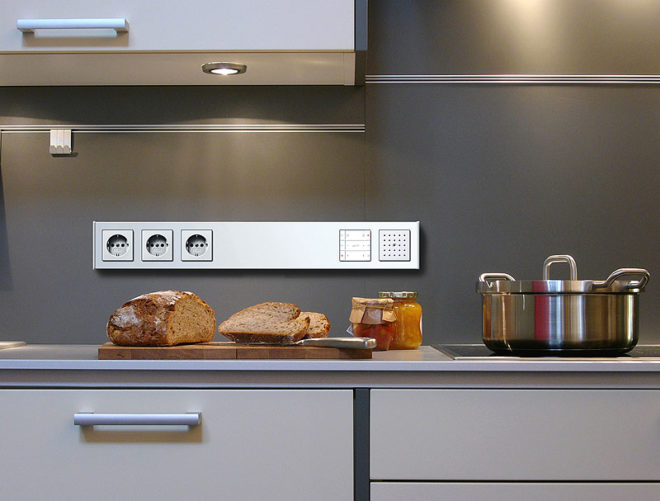
Sockets and switches are located on the walls, which means that they must be safe, functional, and also aesthetically fit into the style and design of the kitchen.
As you can see, one of the important conditions for wiring elements is safety. Therefore, all kitchen electrics must be sufficiently insulated.
Rules for placing kitchen sockets
The wiring in the kitchen can well be assembled by hand, it is only important to take into account all the requirements for these particular rooms. There are especially many nuances in the placement of outlets. Many of them are clearly shown in the video:
As a standard, they are mounted at a height of 25-30 cm from the floor. But in the kitchen this figure can be varied, because it is not always convenient to connect a household appliance in such a place. Very often, several outlets or an outlet block are placed above the so-called kitchen apron (on the working wall) at a height of 100-110 cm from the floor.
- It is forbidden to mount the sockets in a place where moisture can enter them (above or below the sink, behind the dishwasher, near the stove).
- If, for some reason, you cannot keep the distance of 25-30 cm from the floor for the outlet, then know that you can reduce it if necessary. But at least 10 cm should remain between the outlet and the floor, otherwise moisture will enter it when wet cleaning the room.
- The distance from the electrical device to the power outlet is kept to a minimum. Otherwise, there are often such cases when the refrigerator is in one kitchen corner, and the outlet for it is completely opposite.
- You can place sockets inside the cabinets, under the worktop. For this, holes are made in the back of the furniture walls for switching devices. This will save space and not disturb the overall look.
- Never install sockets where there is a possibility of heating (behind the oven, refrigerator, electric oven).
- It is forbidden to place sockets near gas stoves.
As for the design, you can use overhead and built-in sockets. To install them during the repair, holes are made to which grooves (grooves in the wall surface) fit. Sockets are inserted into the holes, sockets are installed in them, and wires are laid in the grooves.
For overhead sockets, you do not need to drill or gouge anything, they are mounted under countertops or on furniture walls.
Switches
With the help of switches, you can control not only the lighting in the kitchen, but also the exhaust fan. That is, the hood has a conductor with a plug, which, in theory, should be plugged into a socket and drive the fan. You can remove the plug, and in place of the outlet, mount a switch that starts and stops the hood.
For luminaires, it is better to put a two-button switch, one key of which will turn on the general lighting, and the second backlight.It is possible to install another ordinary switch on the work wall, with the help of which the illumination of only the workplace will be switched on.

The general switch is mounted at the front door, at a height of 80-90 cm from the floor.
How many wires do you need?
Electrical wiring in the kitchen will require a lot of cable and wire. It is more convenient to plan and calculate everything correctly in an empty room.
- Draw a floor plan for your furniture and appliances.
- Consider the location of the sockets near the appliances.
- Mark on the ceiling where the main light and additional lighting will be.
- On the wall above (at a distance of 15-20 cm from the ceiling), mark the installation location for the junction box. Draw which path the lead-in cable from the common apartment panel will take to it.
- From the junction box, draw wire paths straight along the walls to outlets, switches, and lights. Remember that they can only be horizontal or vertical, no "oblique" to save materials is not allowed.
- You have a visual diagram on your kitchen walls, take a tape measure in your hands and measure the required amount of wire.

Naturally, do not buy end-to-end wires, be sure to take into account the supply for cutting the wires. For lighting, take a wire with copper conductors with a cross section of 1.5 mm2, for powering sockets from 2.5 to 4 mm2.
Open kitchen wiring
For an open type of wiring, you will need a junction box and outdoor switching devices. They attach directly to wall surfaces.
Cable channels are laid along the outlined lines on the ceiling and walls, their fasteners must be done every 30-50 cm, it all depends on how smooth the wall surfaces are in your kitchen. Plastic boxes are attached to concrete with dowel-nails; self-tapping screws are suitable for brick or foam concrete walls.
The main disadvantage of open wiring in cable ducts is that the entire curvature of the walls is immediately visible.
Conductors are laid in cable channels, supplied to sockets, switches and a junction box. After all the connections are made, the cable channels are closed with overhead covers with fixing grooves.

The advantage of an open type of wiring in the kitchen is that it will be easier to redo if you want to change the location of household appliances, or in case of some kind of damage to the network. Plastic cable channels can now be chosen in stores for any color of the kitchen, such boxes with wood-like coloring look especially nice.
Concealed kitchen wiring
There is a lot of dirty, dusty and noisy work to be done before making the hidden wiring. In the places where switching devices will be installed, holes must be drilled. This is done with a chisel and hammer, a hammer drill with special attachments for concrete or brick. In the holes made using plaster or alabaster, the socket boxes are fixed.
To route the wires, special grooves are cut in the walls, called grooves. For this purpose, there is a special tool - a wall chaser. It will be very convenient if you manage to rent such a device, because it is expensive to buy it. But it is very effective in use.
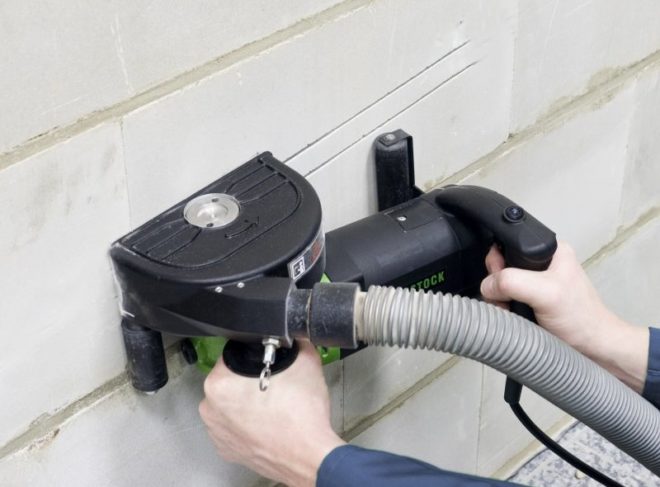
First, you can adjust the width of the groove to be cut, depending on how many wires will be in it and what section. Secondly, many models are immediately equipped with a vacuum cleaner, which allows you to work calmly without polluting the air at the workplace.
In order to quickly and reliably fix the wires in the grooves, use plaster or alabaster mortar.
Remember that such wired wires and switching devices cannot be rearranged from place to place. Therefore, first think over all the pros and cons, and only then make a decision for yourself - what type of wiring to choose for the kitchen.
Note! The walls in which the wires are laid must be dry. If it suddenly turns out that the wall surface is wet, stop all wiring work and dry the wall for several days.
There are a few more nuances in the video, on the kitchen wiring:
At first glance, it will seem to someone that the electrical wiring in the kitchen with their own hands is quite within their power. But this is not so, the experience and knowledge of a professional is needed here in order to subsequently avoid fires, fires or injury to a person by electric shock. Contact a professional electrician, or at least consult with them, and then all the electrical appliances in your kitchen will work reliably.


